
| This page is about an older project of ours. We keep ALL of our projects up on the internet for anyone that's interested...but we are no longer pursuing many of these older ideas. Before starting this project, please check our main Wind Power page to check for similar, more recent designs. These will be the top of the list and flagged with an "active project" tag. If you have any questions about what is current and what is not, or why we no longer work on certain designs, first check out our Wind Turbine Evolution page for a detailed history of how our designs have changed over the years. You can also Email us and we'll fill you in as our email volume permits...check the Evolution page first. |

|
PAGE 1 Stator and Magnet Rotors |
PAGE 2 Assembly and Raising |
PAGE 3 Building Matt's 15 foot turbine |
PAGE 4 Blade Carving -- Matt's turbine |
And, be sure to check out our book Homebrew Wind Power for more small wind power information!
There were some pictures along the way of this black and red machine, which we built for Matt, who lives nearby. On this machine we decided to be a bit more daring and go with a 15' diameter prop. Again, this is a 24 volt machine. The coils are wound with 48 windings made up of 2 strands of #14 wire - which is equiv. to #11 wire. My 14' machine was a 12 volt unit, and the coils each had 24 windings. As mentioned on earlier pages, there were stall problems (the alternator was producing too much current at too low an rpm for the blades to run at an efficient speed) so on mine we had to seperate the magnet disks a bit to compensate. We stuck with the same formula for the coils, figuring that the larger, wider 15' blade would have the power to handle it.
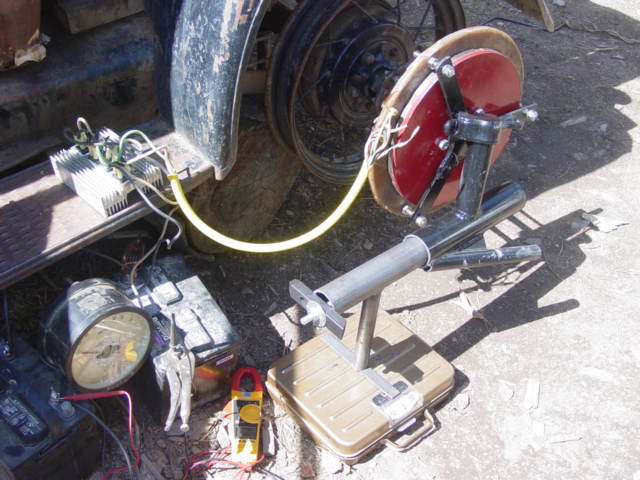
I rigged up an adaptor so I could bolt the alternator to the rear axel of my '30 Ford Pickup. By measuring output, rpm, and foot pounds I got a pretty good idea of the power curve for this alternator. It didn't seem far off the mark for a 15' prop - especially when I considered that the line from the tower would be almost 300' long. Click Here to read the whole page about testing these alternators.

We built the blades from scratch, starting with a douglas fir tree that had blown down a couple years ago nearby. Click Here to read the page about how we made the blades.

I added a gusset to the tube that offsets the alternator, and filled the tail pivot with 1/8" diameter stainless steel rods, and welded it over. This should make it a bit stronger. I had some concerns about the tail pivot cracking.

Matt made the tail to be a concerned Border Collie, standing on cloud nine... herding the wind. (the machine will also be sitting nearly over hole #9 on his mountain golf course)

Here Matt is assembling the machine for the first time on a stand in front of the shop.

We added 1 8" wide piece of angle iron to each side of the hub on each blade, so that we could bolt through and squeeze the hub together very tightly. This made the hub much stronger. We then balanced the blade with shorter bits of angle iron and bolted them on so that they might stir some air up around the stator. After testing this alternator on the ground at 2KW output, overheating is a bit of a concern and perhaps this will help a bit.

Here is the tower on the ground. It's 43' tall, from 3" diameter pipe. The top 10' are reinforced -hopefully it's rigid enough. The base is a simple pivot which is staked to the ground, and all the guy wire mounts are drilled into rock nearby. At 43', it gets nicely above the trees looking to the North, West, and South - but to the East its not high enough. The prevaling wind here is from the West so it should workout OK.

Pictured above neighbors are helping to assemble the machine on the tower top. You can see I've welded a support, or 'Foot' on the tower so that when the machine comes down the tower is not able to hit the ground. This makes it a bit easier and safer to work on.

There it is! She went up smoothly - we pull this tower up with a truck. At this time it's been up for only about 3 weeks. It seems to be doing very well in low winds. The very calmest days we still see output from it frequently. On windier days we've seen about 1.5KW from it - which seems to be the point at which it starts to furl. If it holds together over time, I think it will produce a lot of power! Time will tell. It's about 300' from the batteries, and we brought the power in on 3 strands of #4 wire. Although there is some resistance in the line... we are counting on that to bring the power curve of the machine more inline with that of the blade. Were the line too thick.. it would probably stall badly. Were it too thin - it would overspeed. As it is, I have a feeling its pretty close. Though there is no anemometer on the site, I would say just from watching, that it works slightly better than my 12 volt 14' machine which is featured on the previous page.
|
PAGE 1 Stator and Magnet Rotors |
PAGE 2 Assembly and Raising |
PAGE 3 Building Matt's 15 foot turbine |
PAGE 4 Blade Carving -- Matt's turbine |