
| This page is about an older project of ours. We keep ALL of our projects up on the internet for anyone that's interested...but we are no longer pursuing many of these older ideas. Before starting this project, please check our main Wind Power page to check for similar, more recent designs. These will be the top of the list and flagged with an 'active project' tag. If you have any questions about what is current and what is not, or why we no longer work on certain designs, first check out our Wind Turbine Evolution page for a detailed history of how our designs have changed over the years. You can also Email us and we'll fill you in as our email volume permits...check the Wind Turbine Evolution page first. |
This page is about a windmill experiment. The windmill was built for under $100, and although there is certainly much room for design improvement, it works fairly well and should provide some data to other folks who'd like to build their own from scratch! If time is money, and one has more money than time, it might be wise to buy a commercial machine, there are many good ones starting from about $500 on up, however to build one at home is fun, and it can save a lot of money! It's my hope that "experts" (folks more knowledgeable than myself on this topic) will review this page and offer suggested improvements on our discussion board! This page will break down the components of the machine and in the end I'll discuss what I know about its performance!
And, be sure to check out our book Homebrew Wind Power for more small wind power information!
The Propeller
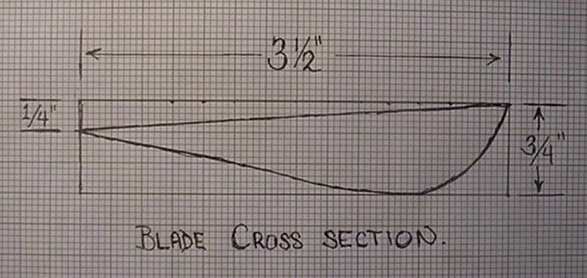
The propeller for this machine is a 3 bladed design. Although a 2 blade prop is simpler to build, they have the disadvantage of being harder to start. The other drawback is that when the wind changes direction, a 2 blade prop tends to vibrate quite a bit while turning. This is hard on the prop, and the generator bearings. I made my prop out of spruce 1" X 4" boards. I tried to pick 3 boards which were knot free, had good vertical grain and seemed to have similar density. (they weighed about the same). Of course other types of wood could be used, this is what I had available. I've made very good props from redwood, ponderosa and lodgepole pine with no problems. I used 1" X4" (actually - it was planed down to about 3/4" X 3 1/2") because I wanted the prop to be light weight, I think this helps them start faster and preserves the bearings on the generator. It seems consistent with props I've seen on small commercial windmills. I carved my prop real fast, took about 2 hours. Undoubtedly, had I spent more time I 'd probably have a better prop, but...I have seen folks spend a week on this stage and I feel it can be a fairly quick and simple project. I used "intuition" on both the pitch of the prop, and the airfoil shape. I simply marked 1/4" down on the thickness of the prop, so that over the 3 1/2" width the low end would be 1/4" below the high end. There is a LOT of information on prop carving, airfoil details etc on the Internet. The Lee-Jay manual, published in the 1930's also has good simple instructions for both propeller carving and building a windmill from scratch. See the picture below....
Once roughed out, I weighed each prop and planed them down so they were the same. I then bolted them together, two at a time, and further planed them down so they were reasonably balanced. Once all three blades were the same weight, I painted them, and bolted them to a hub (an old gear about 8" diameter). Once on the hub, I could put the whole assembly on a shaft, and spin it. I would observe the place in which the prop stopped, if it had tendency to stop in 1 place more often than others, I would plane down the heavy side(s) until it seemed perfectly balanced. (of course I had to paint those spots again!). The whole process of building this prop, and balancing it took less than 4 hours. It should be noted that all 3 blades, after being balanced, were NOT of the same thickness. At the tip, they varied from in thickness by over 1/8"! This could have been prevented by finding better wood, and taking more time in the initial carving of the prop. The main tool I used for carving this prop was a power planer. It should also be noted, this prop has NO twist, the pitch remains the same from the hub, to the tip. Although unsure, I do not think this hurts, especially in a small machine. Total prop diameter is approx. 6 1/2'...although, to be honest, I never measured it! This is the same propeller I tested on my model A ford. Click here to check out that page! . It worked so well on the Ford test, that I figured it would hold up on a windmill. The only modifications I made since that test was to cut about 8" off the diameter and further balance it.
The Alternator
The alternator used in this windmill is a 2hp induction motor which I took off a Taiwanese milling machine. I took it apart, and cut a slot into the armature with a metal lathe so that I could insert 8 Neodymium rare earth magnets, thus turning the induction motor into a permanent magnet low rpm alternator. The magnets are rectangular in shape, and curved such that they seem to be a good fit in the armatures of most induction motors 1/2hp on up. I cut a slot in the armature so that when pressed all the way down, the highest point on the magnets is flush with the outer diameter of the armature. The slot is cut so the magnets are a tight fit, and the magnets are glued in with epoxy. This is a 4 pole motor, so it requires 4 alternating poles in the alternator. To accommodate 8 magnets, I had to insert them in pairs, with two magnets of identical polarity beside each other. These particular magnets are surplus from computer hard drives and are available with both North, and South on the convex surface. See a picture of 8 of these magnets in a ring below. You'll find these same magnets for sale on our products page.

The alternator is wired so that it hits 12 volts at approx. 160rpm. Had I wired the motor differently it could have hit charging voltage at 80 rpm, but I was afraid this would limit the current too much. Of course, the output here is alternating current and it must be rectified before charging batteries. I used a 40 amp bridge rectifier to reach this end. We also offer large bridge rectifiers on our products page. It is very important that when using a diode, or a bridge rectifier in this application that it be attached to a suitable heat sink, or else it will got too hot and burn up! Click here to see our experiments page about converting induction motors into low rpm alternators.
The Tower
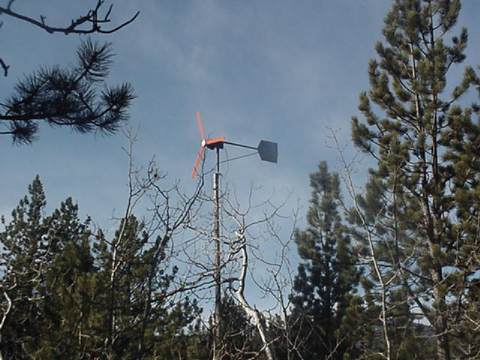
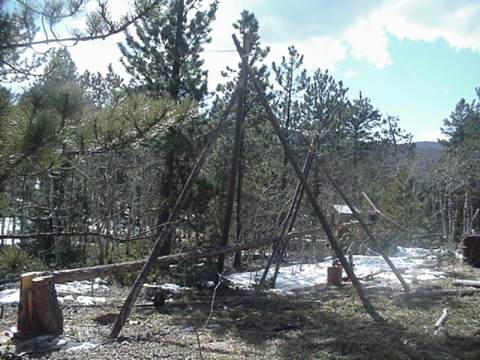
The tower is probably the MOST important part of any wind machine, and is often the most neglected....this is probably the case here! I put this up in the middle of Feb, it was very cold, the ground was very frozen and I didn't have the ability to pour a proper concrete pad which I think would make for a nice tower base. I also have the disadvantage of being in a forest, with no level ground. Although this works OK, I feel a much higher tower would be appropriate. My windmill currently sits 36' feet above the ground. I removed one large pine tree, as I thought that would be the best place for the tower. I cut the stump off about 3' high, and notched it with a chain saw. The mast is made from a lodgepole pine. The base of it was drilled through so that it could pivot in the stump. The top of it has a steel assembly made from pipe, to allow support and pivoting of the windmill. I while assembling the windmill the tower was supported off the ground by a small tripod made from lodgepole pine. A larger tripod was used for raising it. The tower is supported by 4 guy wires of 1/8" diameter aircraft cable with turn buckles on the ground for adjustment.
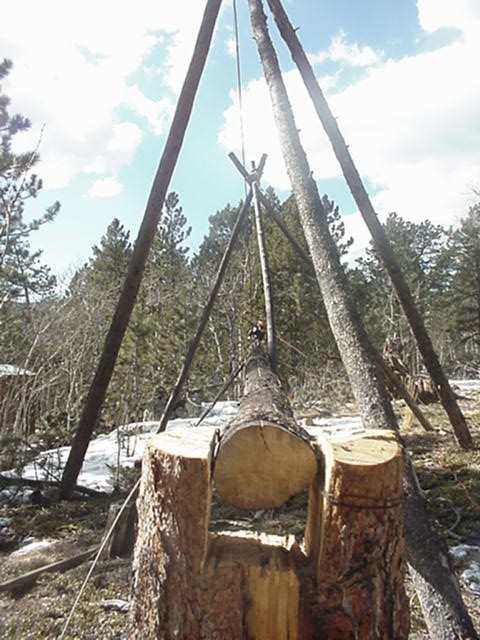
I simply used a truck, a long cable, and the large tripod to raise the mast, it went smoothly!
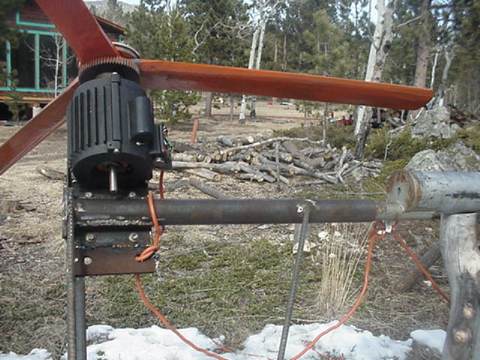
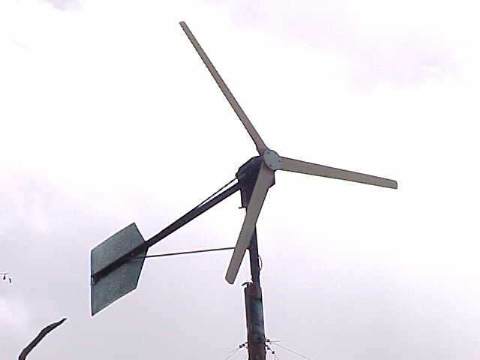
The windmill chassis and tail
The windmill is really very simple. I started with a 3/8" thick piece of steel to which the alternator could be bolted. To that I welded a pipe, which fits over a smaller pipe on the top of the tower - this is what the windmill pivots on. There are no slip rings in this machine, I simply ran enough aircraft cable so that the machine could pivot several times before it gets tight. The power line from the alternator is slightly longer than this cable, the idea being that the aircraft cable will get tight just before the power cord. The tail sits back about 4' from the pivot, and is bolted into angle iron. Two 1/2" diameter steel rods serve to further support the tail. In home built windmills I've seen...tails breaking off seems a common problem. This part needs to be strong, and a well balanced prop will also help prevent metal fatigue. I offset the tail, and the alternator slightly from the pivot, in hopes that it would turn out of the wind should it get too fast. This was done intuitively, I have no specific data on how to do this right, but it was my intention to move in the direction of several home-built windmill I've seen before. See Hugh Piggots design!
Performance
So far, so good. The alternator has a slight cogging affect, which keeps this machine from starting easily at low wind speeds (below about 10mph). This could be solved by a bigger prop, wider blades, or...more blades! I think should I try to improve this I will use wider blades. Once started it keeps spinning well at very low speeds. We have very gusty winds, the direction changes frequently so it is difficult for me to offer specifics on output vs wind speed. Best output I've seen in high winds is approx. 25 amps, though typically it puts out 5-15amps (into my 12 volt batteries) in low, to medium wind speeds. It is possible that a regulator could be made with a matching transformer or possibly a linear current booster that would better match the load to the alternator and provide significantly more output, I've not tried this yet. This machine does perform much better than smaller ones I've made using surplus DC tape drive motors, and so far it has held up well to extremely high winds. It does seem to turn out of the wind somewhat in extreme conditions, although I doubt it needs to.
Again, building these at home is fun, and rewarding. Lots more fun, in my opinion than buying an expensive new machine! I hope that folks provide input about their own machines, and their comments about this one! This machine, although fairly quick and easy to build, is a culmination of several experiments....the prop, the alternator, the tower. Please check out our products page for a few of the items I used to build this machine and some interesting books!
April 8 update
After about 8 weeks up, there was a breakdown! On the radio they were predicting 80+mph winds. I took care to go out, make sure all the guy wires were good and tight and did what I could to help insure its survival. At about 4pm I woke up to a most unpleasant sound. Although still running, and pegging the 20 amp meter it definitely had a problem. Turns out she threw a blade in extremely high winds. Considering the lack of time I put into them, it really came as on surprise and I was grateful for the data.
I found the piece of broken blade only 20' from the base of the mast. Turns out, the blade definitely had a crack in it, before I even raised the windmill, I could tell by the paint which had seeped into the wood. The other two blades were still in fine shape, suggesting that the design would have been good, had I taken more care to use better wood in making the prop. This was especially surprising considering how long the machine ran in extremely high winds, with only two blades!
Rather than replacing the one broken blade, I decided to make a new prop all together. It's slightly larger, the diameter being just over 7 feet. These new blades are 4" wide at the hub, and 3" wide at the tip. The wood is much stronger. The pitch is similar, although this new blade has a little twist to it. Although it's been up for less than 24 hours, I can already tell it starts much easier. It's still real quiet even at high speeds. It should make for an interesting test, the tips of this new blade are only 3/8" thick. The blades are of good vertical grain pine, each one weighs exactly 11 oz.
Other good information from this breakdown...the tower. It came down and went back up very easily with no problems at all. I simply used an A frame built from lodge poles, my truck, and a cable. Total down time, 4 hours, thats how long it took to lower it, build a new prop, finish it and get her back in the air again!
In conclusion, I believe, judging from the improvements on the new props that this machine will probably hold up well over time. In watching it for a few weeks now it seems to do a find job producing up to 400 watts. In "normal" winds it produces between 100 and 200 watts. It seems to outperform some small commercial windmills, which I have also had opportunity to watch. It's very quiet even in high winds. Overall I would say this experiment has been a good one! Please email us with comments, questions, or suggestions.