
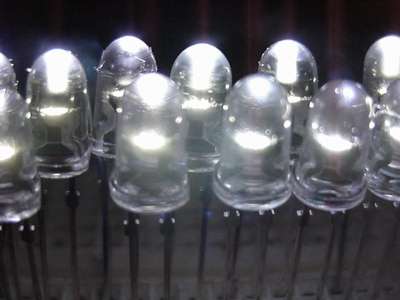
Light Emitting Diodes (LEDs) have been around for years in red, yellow and green. New technological advances have given us incredibly bright blue and white versions--the white LEDs on our products page are state-of-the-art in brightness. The rated brightness varies by how wide the beam angle is. LEDs with a super-high brightness rating also have a very narrow beam angle. Wider-angle LEDs have a lower brightness rating, but may put out just as much light. It's important to choose the beam angle to suit your needs.
White LEDs are perfect for replacing small, inefficient incandescent bulbs in night lights, flashlights, path lights, task lights and exit signs. Try 6-9 white LEDs for reading and task lights, and 1-3 LEDs for flashlights and path lights.
LED ratings are specified by current, not voltage. For longest life, we recommend you run them at 20-25 milliamps (ma). HOWEVER, in our LED flashlight conversions (and many commercial LED flashlights), the LEDs are run at 50-60ma, twice the rated current. One of our test LEDs ran at 98ma for over 200 hours without damage or appreciable light loss. So go ahead and experiment with running them at over rated current if you are willing to take the risk of a shorter life. In my opinion, a flashlight bulb that lasts 100 hours is a huge improvement and cost saver over the incandescent alternative which gives only 15-20 hours before it dies. You must use some method of limiting current to your strings of LEDs. The easiest is simply using the right number of LEDs for your supply voltage. Each white LED gives a voltage drop of 3.6 volts. So, for a 115 volt DC light, you could use 32 white LEDs in series (115 / 3.6 = 32 +/-) with NO current limiting (they will limit themselves by their inherent voltage drop). In reality, though, there are many other circuit design issues you need to look at to build a reliable 115VAC home LED lighting fixture! We link to a few resources farther down on this page, and you can always Google up 'LED lighting circuits' for more information. Reverse polarity will not damage an LED unless the voltage is very high--it simply will not work, and will not pass current through. However, be sure to check the manufacturer's rating for the specific LEDs you are using--there are some out there, particularly the latest models, that can be damaged by relatively low reverse voltages. The diagram below shows how the LED package is marked for polarity.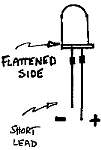
 The next easiest is a simple resistor. The resistor does consume power, though, but is usually needed since an 'ideal' 3.6 volt source is rarely available. Use Ohms law (Resistance(R)=Voltage(E)/Current(I)) to calculate the value and wattage needed: (R=E/I)
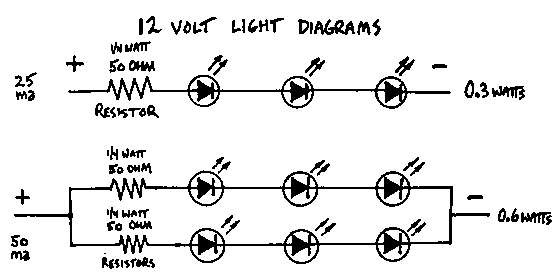
Each white LED gives a voltage drop of 3.6 volts. As an example, for a 12 volt light, you can run a maximum of 3 white LEDs in series at full power (3.6 x 3 = 10.8 volts drop). Subtract this from your supply voltage of 12 volts to get the additional voltage that must be dropped (in this case, 12 - 10.8 = 1.2 volts of additional drop needed). In this case, 1.2 volts of additional drop / .025 amps (25 ma) = 48 ohms. Use the next highest value of resistor available, 50 ohms. You must also be sure the resistor can handle enough current. Volts x Amps = Watts; resistors are rated in watts. So in this case, 1.2 volts x .025 amps = 0.03 watts. A 1/4 watt resistor will work fine, but if you run a second string of 3 LEDs in parallel, each string would need its own 50 ohm resistor. It's important that each string has its own resistor....putting them in parallel with a single resistor is bad practice.
The next easiest is a simple resistor. The resistor does consume power, though, but is usually needed since an 'ideal' 3.6 volt source is rarely available. Use Ohms law (Resistance(R)=Voltage(E)/Current(I)) to calculate the value and wattage needed: (R=E/I)
Each white LED gives a voltage drop of 3.6 volts. As an example, for a 12 volt light, you can run a maximum of 3 white LEDs in series at full power (3.6 x 3 = 10.8 volts drop). Subtract this from your supply voltage of 12 volts to get the additional voltage that must be dropped (in this case, 12 - 10.8 = 1.2 volts of additional drop needed). In this case, 1.2 volts of additional drop / .025 amps (25 ma) = 48 ohms. Use the next highest value of resistor available, 50 ohms. You must also be sure the resistor can handle enough current. Volts x Amps = Watts; resistors are rated in watts. So in this case, 1.2 volts x .025 amps = 0.03 watts. A 1/4 watt resistor will work fine, but if you run a second string of 3 LEDs in parallel, each string would need its own 50 ohm resistor. It's important that each string has its own resistor....putting them in parallel with a single resistor is bad practice.
 This method is cheap and works great, but there's one problem--voltages in a remote power system (or car, for that matter) tend to vary. In our home system, voltages range from about 12 volts when the batteries are low up to 14 volts when equalizing the battery bank. An LED lamp string designed to run at 25 milliamps at 12 volts would be pushing 64 ma at 14 volts, which would be very bright and PROBABLY last at least a few hundred hours...but then then when your batteries are low, the LEDs will pull only 10ma or so, making them very dim. If you are looking for maximum lifespan (which could be over 10 years of run time) and brightness that doesn't vary with your battery condition, try a voltage regulator circuit (below).
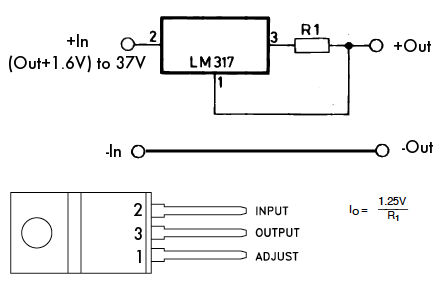
So, we highly recommend a simple voltage regulator chip for the safety of your LEDs. White LEDs are expensive, and it would be a shame to blow them out. Parts for a current-limiting circuit are very cheap--less than $2. Use the Ohm's law calculations above to select the resistor for the voltage you choose. Or, use the regulator in a current-limiting configuration to run the LEDs. You can also use an LM317 adjustable voltage regulator set to the exact current level needed by your strings of LEDs. See the circuit diagrams below.
We originally described using an LM7812 voltage regulator chip for this application, but it presents some problems--they generally won't start regulating until input voltage reaches 13.4v, and they have a 1.4 volt voltage drop, leaving you with under 12 volts at typical RE system voltages. Instead, the LM317 is a better choice, and you can adjust its output to fit your needs. Choose your current-limiting resistors as shown in the diagram below. This protects your LEDs from fluctuating system voltages.
This method is cheap and works great, but there's one problem--voltages in a remote power system (or car, for that matter) tend to vary. In our home system, voltages range from about 12 volts when the batteries are low up to 14 volts when equalizing the battery bank. An LED lamp string designed to run at 25 milliamps at 12 volts would be pushing 64 ma at 14 volts, which would be very bright and PROBABLY last at least a few hundred hours...but then then when your batteries are low, the LEDs will pull only 10ma or so, making them very dim. If you are looking for maximum lifespan (which could be over 10 years of run time) and brightness that doesn't vary with your battery condition, try a voltage regulator circuit (below).
So, we highly recommend a simple voltage regulator chip for the safety of your LEDs. White LEDs are expensive, and it would be a shame to blow them out. Parts for a current-limiting circuit are very cheap--less than $2. Use the Ohm's law calculations above to select the resistor for the voltage you choose. Or, use the regulator in a current-limiting configuration to run the LEDs. You can also use an LM317 adjustable voltage regulator set to the exact current level needed by your strings of LEDs. See the circuit diagrams below.
We originally described using an LM7812 voltage regulator chip for this application, but it presents some problems--they generally won't start regulating until input voltage reaches 13.4v, and they have a 1.4 volt voltage drop, leaving you with under 12 volts at typical RE system voltages. Instead, the LM317 is a better choice, and you can adjust its output to fit your needs. Choose your current-limiting resistors as shown in the diagram below. This protects your LEDs from fluctuating system voltages.
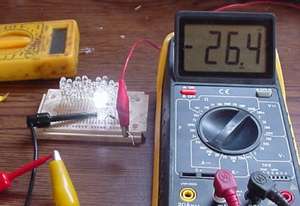
 You really need to use a multimeter for any LED circuit design and construction($10). If you have an RE system, you should already own a multimeter! and solderless breadboard ($5) for designing your home built LED fixtures. Both are available at Radio Shack. With the multimeter, you can check your polarity, voltages, resistors, and current draw before assembling the final version of your light by soldering. The breadboard allows you to make changes to the circuit without soldering, and makes it easy to transfer the working circuit to a soldered version--solder-in PC boards are available that exactly match the connections of your solderless breadboard. (see photo below).
- LEDs can last tens of thousands of hours if used at rated current
- No annoying flicker like from fluorescents
- LEDs are impervious to heat, cold, shock and vibration
- No breakable glass is used, and LED lights can be waterproofed for marine use
Designing LED lighting
DISCLAIMER: None of us here are electronics experts. We've already corrected this page numerous times thanks to real electronics experts who have emailed us. What we'd really like is for a real electronics expert to completely re-write this page for us!LED ratings are specified by current, not voltage. For longest life, we recommend you run them at 20-25 milliamps (ma). HOWEVER, in our LED flashlight conversions (and many commercial LED flashlights), the LEDs are run at 50-60ma, twice the rated current. One of our test LEDs ran at 98ma for over 200 hours without damage or appreciable light loss. So go ahead and experiment with running them at over rated current if you are willing to take the risk of a shorter life. In my opinion, a flashlight bulb that lasts 100 hours is a huge improvement and cost saver over the incandescent alternative which gives only 15-20 hours before it dies. You must use some method of limiting current to your strings of LEDs. The easiest is simply using the right number of LEDs for your supply voltage. Each white LED gives a voltage drop of 3.6 volts. So, for a 115 volt DC light, you could use 32 white LEDs in series (115 / 3.6 = 32 +/-) with NO current limiting (they will limit themselves by their inherent voltage drop). In reality, though, there are many other circuit design issues you need to look at to build a reliable 115VAC home LED lighting fixture! We link to a few resources farther down on this page, and you can always Google up 'LED lighting circuits' for more information. Reverse polarity will not damage an LED unless the voltage is very high--it simply will not work, and will not pass current through. However, be sure to check the manufacturer's rating for the specific LEDs you are using--there are some out there, particularly the latest models, that can be damaged by relatively low reverse voltages. The diagram below shows how the LED package is marked for polarity.
The next easiest is a simple resistor. The resistor does consume power, though, but is usually needed since an 'ideal' 3.6 volt source is rarely available. Use Ohms law (Resistance(R)=Voltage(E)/Current(I)) to calculate the value and wattage needed: (R=E/I)
Each white LED gives a voltage drop of 3.6 volts. As an example, for a 12 volt light, you can run a maximum of 3 white LEDs in series at full power (3.6 x 3 = 10.8 volts drop). Subtract this from your supply voltage of 12 volts to get the additional voltage that must be dropped (in this case, 12 - 10.8 = 1.2 volts of additional drop needed). In this case, 1.2 volts of additional drop / .025 amps (25 ma) = 48 ohms. Use the next highest value of resistor available, 50 ohms. You must also be sure the resistor can handle enough current. Volts x Amps = Watts; resistors are rated in watts. So in this case, 1.2 volts x .025 amps = 0.03 watts. A 1/4 watt resistor will work fine, but if you run a second string of 3 LEDs in parallel, each string would need its own 50 ohm resistor. It's important that each string has its own resistor....putting them in parallel with a single resistor is bad practice.
This method is cheap and works great, but there's one problem--voltages in a remote power system (or car, for that matter) tend to vary. In our home system, voltages range from about 12 volts when the batteries are low up to 14 volts when equalizing the battery bank. An LED lamp string designed to run at 25 milliamps at 12 volts would be pushing 64 ma at 14 volts, which would be very bright and PROBABLY last at least a few hundred hours...but then then when your batteries are low, the LEDs will pull only 10ma or so, making them very dim. If you are looking for maximum lifespan (which could be over 10 years of run time) and brightness that doesn't vary with your battery condition, try a voltage regulator circuit (below).
So, we highly recommend a simple voltage regulator chip for the safety of your LEDs. White LEDs are expensive, and it would be a shame to blow them out. Parts for a current-limiting circuit are very cheap--less than $2. Use the Ohm's law calculations above to select the resistor for the voltage you choose. Or, use the regulator in a current-limiting configuration to run the LEDs. You can also use an LM317 adjustable voltage regulator set to the exact current level needed by your strings of LEDs. See the circuit diagrams below.
We originally described using an LM7812 voltage regulator chip for this application, but it presents some problems--they generally won't start regulating until input voltage reaches 13.4v, and they have a 1.4 volt voltage drop, leaving you with under 12 volts at typical RE system voltages. Instead, the LM317 is a better choice, and you can adjust its output to fit your needs. Choose your current-limiting resistors as shown in the diagram below. This protects your LEDs from fluctuating system voltages.
You really need to use a multimeter for any LED circuit design and construction($10). If you have an RE system, you should already own a multimeter! and solderless breadboard ($5) for designing your home built LED fixtures. Both are available at Radio Shack. With the multimeter, you can check your polarity, voltages, resistors, and current draw before assembling the final version of your light by soldering. The breadboard allows you to make changes to the circuit without soldering, and makes it easy to transfer the working circuit to a soldered version--solder-in PC boards are available that exactly match the connections of your solderless breadboard. (see photo below).
Large AC LED lights
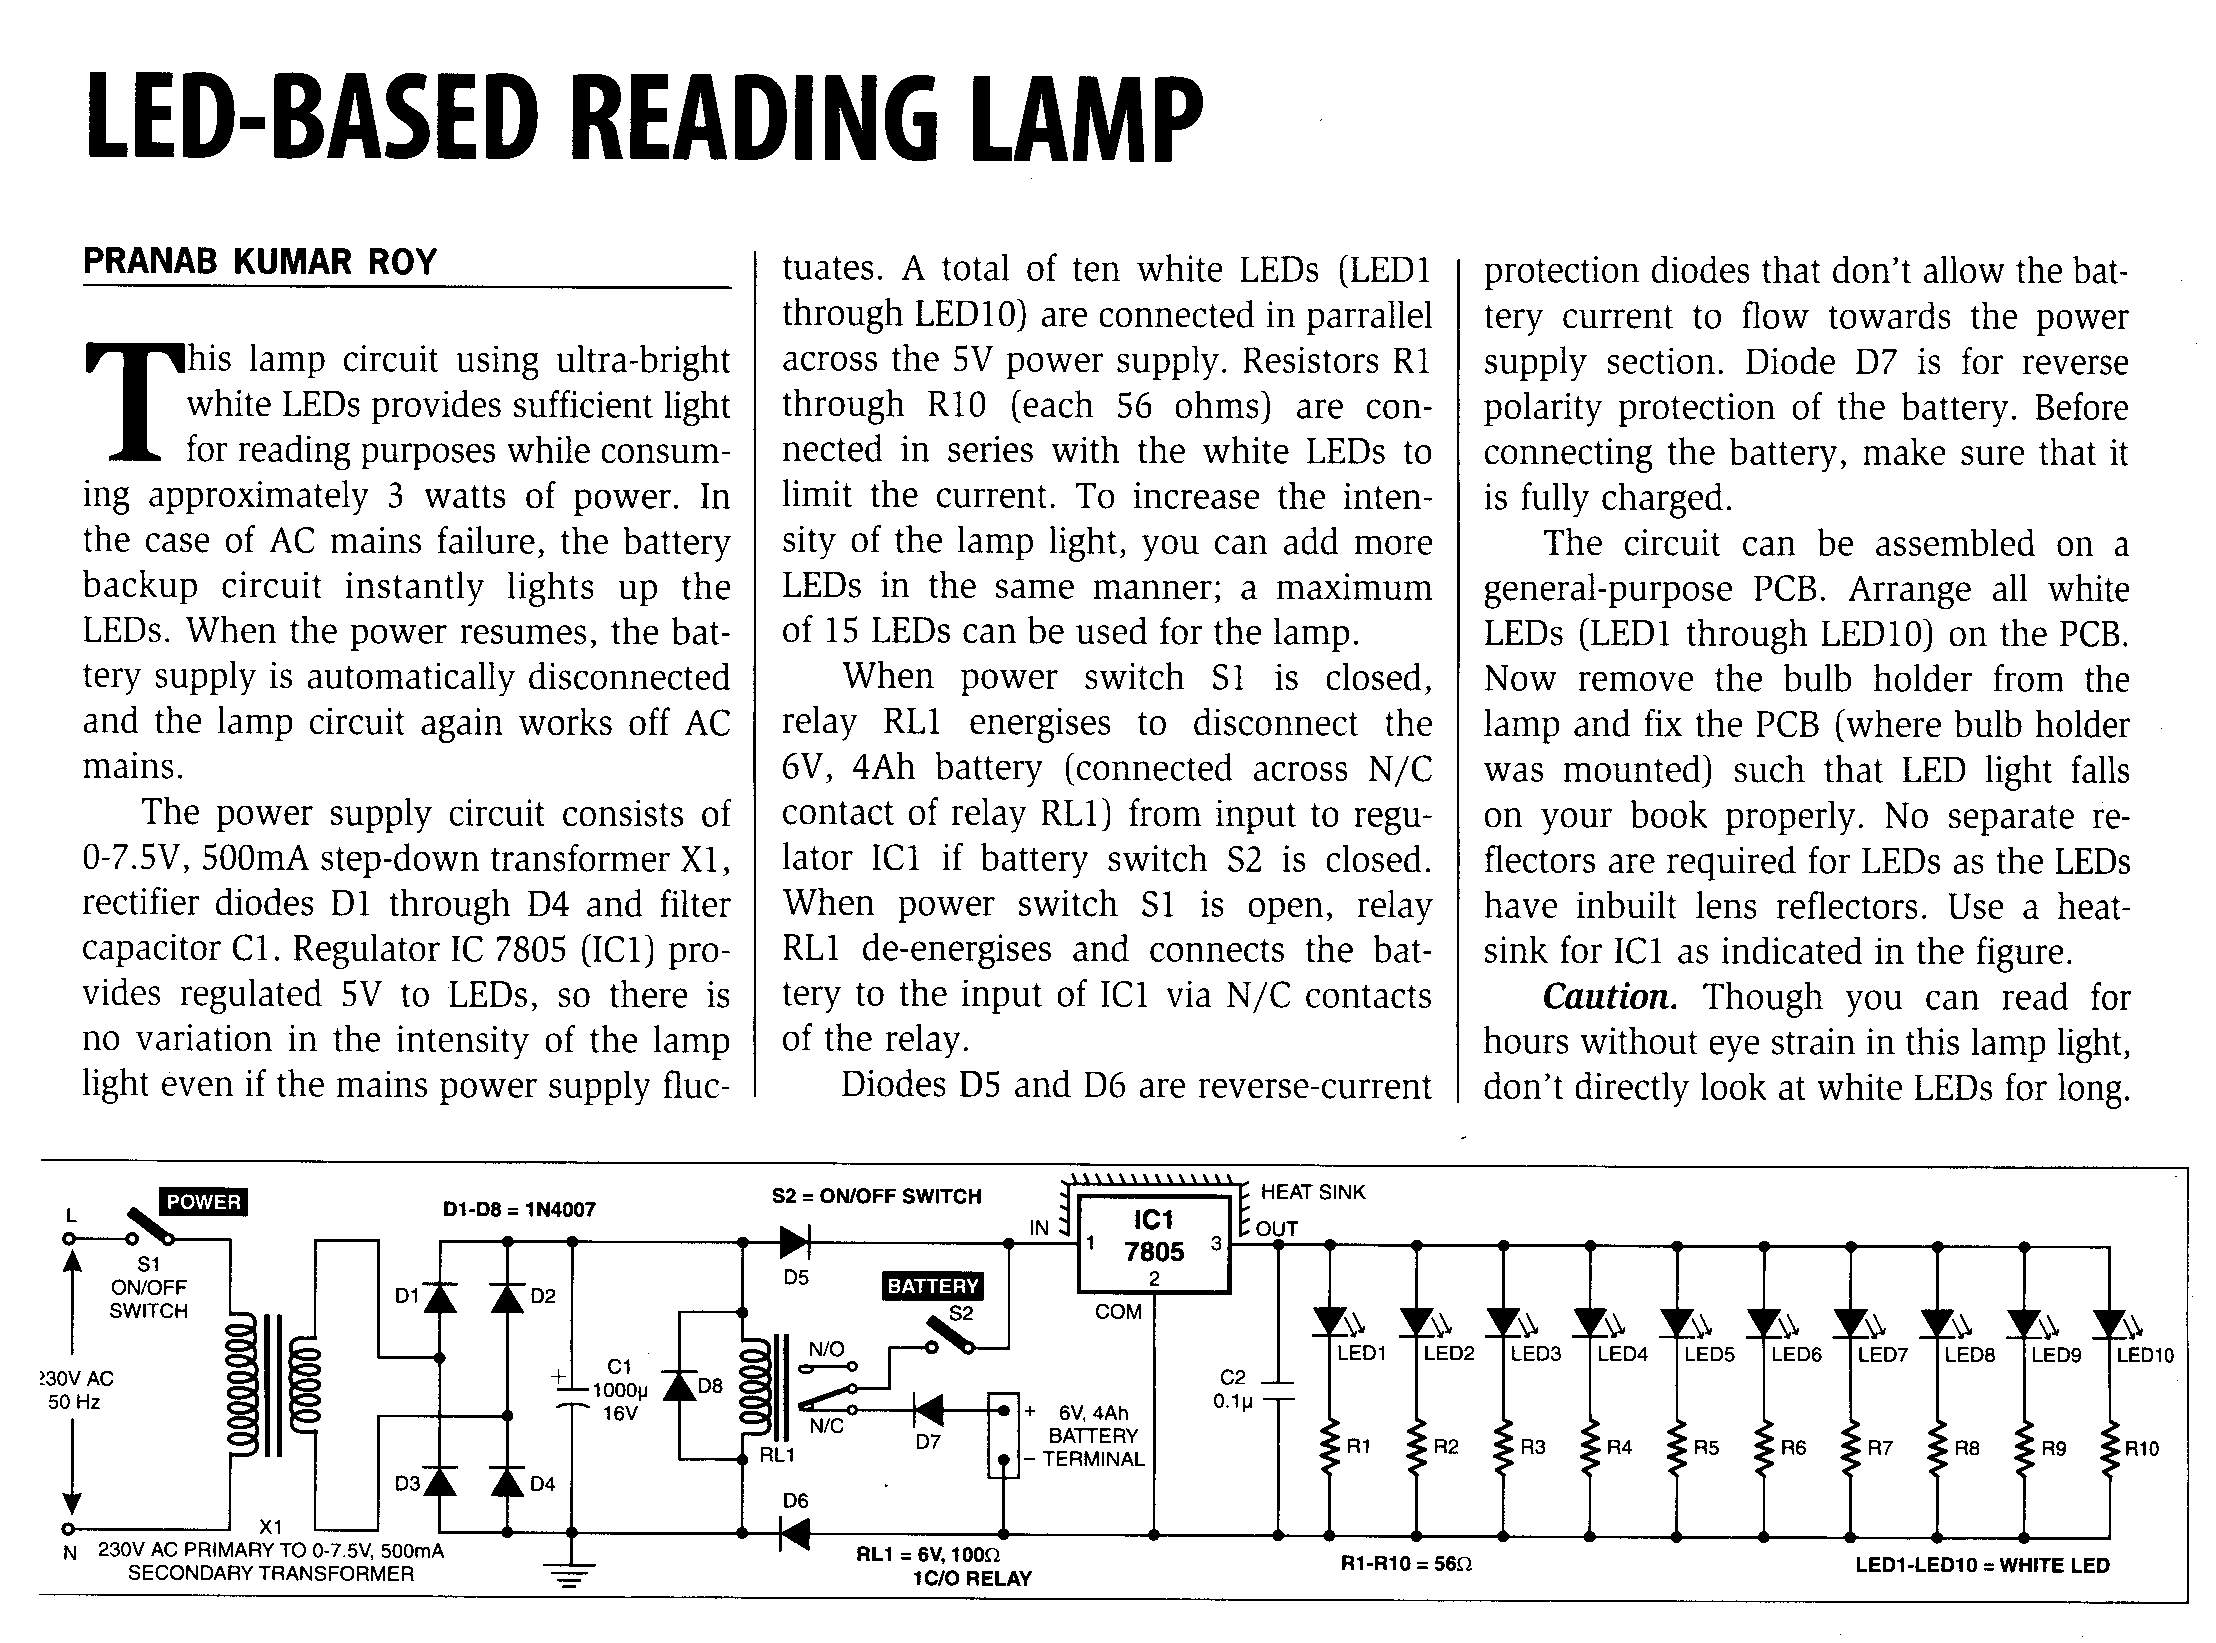
Large LED clusters that run on 120VAC are extremely expensive to purchase--usually US$200 and up. You can home build them, but the electronics and design are much more complicated than the DC circuits above. Because LEDs are directional, they are not always a very good choice for room lighting...but work very well for task lighting. Here's some more information:3-watt AC 10-LED Reading Lamp Circuit
LEDs are excellent for task lighting, and this circuit also has battery backup built in -- when AC power goes out, the LED cluster switches to battery power. Submitted by Pranab Kumar Roy, an electrical engineering student at Nagpur University, India. Designed for 230VAC European grid power, and could be used on 120VAC USA grid power by replacing the transformer. Circuit and text image is 500K bytes.
More AC LED circuit design information: http://ourworld.compuserve.com/homepages/Bill_Bowden/page10.htm#lineled.gif
We'd appreciate any other links you can send us about designing LED lighting fixtures, especially for 120v AC house current applications.
Other LED design and handling concerns
- If your LED mounting does not allow any air circulation, we recommend running them at 18-20ma instead of 25ma to avoid any heat buildup, which will shorten their life.
- LED lights generally do not need reflectors, as the angles at which they emit light are set internally. Our white LEDs emit in a 20 degree arc. Very little light is wasted from shining in the wrong direction.
- Although our LEDs are not powerful enough to require eye protection labelling, DO NOT look directly into the beam from a close distance, just like with a halogen lamp.
- Solder your connections quickly and efficiently, using a small (less than 30 watt) soldering iron. LEDs can be ruined if the internal temperature gets too high from soldering.
- Do not place too much strain on the LED leads when bending them. Bend the leads ONLY below the sqaure tab on each lead.
- LEDs are sensitive to static. The manufacturer recommends a grounding wrist strap, but we have had no problems without one during our research. Just be careful not to drag your feet across the carpet and grab a handful of LEDs...or simply touch a grounded metal chassis before handling LEDs.