
Many flashlights can be easily converted to use white LEDs instead of regular incandescent bulbs. The flashlight can quickly be returned to its original bulb and battery configuration later if you wish. Of course this procedure will void the warranty on your flashlight, but the only permanent modification made is increasing the size of the hole in the reflector assembly.
Since I live in a remote area with no streetlights and am a volunteer firefighter, flashlights are very important and are used daily by everyone in the family. I normally use Maglite® flashlights in different sizes for reliability reasons, but have been frustrated with short battery and bulb life. I normally get only 5 hours on 2xAA batteries, and have to change bulbs every 2 sets of batteries or so. Converted white LED MiniMaglites® have become my favorite flashlights! Though the LED conversions are not as bright as normal bulbs, the batteries last over 6 times as long, and I have not replaced an LED bulb yet despite running them at over their maximum current.
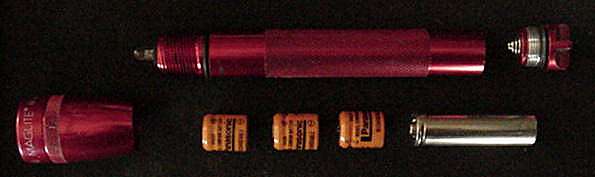
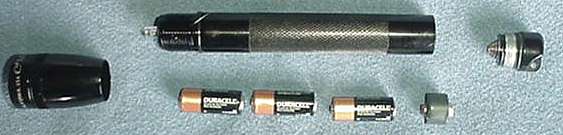 Alkaline N-Cell Flashlights
Alkaline batteries are often the best choice for flashlights, since they retain more power when sitting unused for long periods of time. And you can expect over 6 times longer battery life when using a white LED bulb! This is important when a flashlight must sit in your truck for weeks or months without use. In this situation, NiCad or NiMh rechargables would most likely have little power left in them after sitting for months. Alkaline N-cells are inexpensive and usually locally available--try Radio Shack or K-Mart.
Alkaline N-Cell Flashlights
Alkaline batteries are often the best choice for flashlights, since they retain more power when sitting unused for long periods of time. And you can expect over 6 times longer battery life when using a white LED bulb! This is important when a flashlight must sit in your truck for weeks or months without use. In this situation, NiCad or NiMh rechargables would most likely have little power left in them after sitting for months. Alkaline N-cells are inexpensive and usually locally available--try Radio Shack or K-Mart.
 Since white LEDs require 3.6 volts and the 3 N-cells in series provide 4.5 volts, a current limiting resistor is required. A 15 Ohm resistor limits the current draw to about 30 milliamps when the batteries are new, tapering off as the batteries drain. In my personal flashlite, I used a 10 Ohm resistor which gives about 50 milliamps with new batteries, and noticably brighter light. This is over the current rating for the LED, but I have got over 200 hours out of the LED. There are so vany varibles in LED life when running at overcurrent, that I cancelled my testing of this. But you can expect 100 hours, and might get 500 -- I did once, but 200 is the average. At rated current, the LED could last 100,000 hours -- but the light is not very bright.
Rechargable NiCad Flashlights
Since white LEDs require 3.6 volts and the 3 N-cells in series provide 4.5 volts, a current limiting resistor is required. A 15 Ohm resistor limits the current draw to about 30 milliamps when the batteries are new, tapering off as the batteries drain. In my personal flashlite, I used a 10 Ohm resistor which gives about 50 milliamps with new batteries, and noticably brighter light. This is over the current rating for the LED, but I have got over 200 hours out of the LED. There are so vany varibles in LED life when running at overcurrent, that I cancelled my testing of this. But you can expect 100 hours, and might get 500 -- I did once, but 200 is the average. At rated current, the LED could last 100,000 hours -- but the light is not very bright.
Rechargable NiCad Flashlights
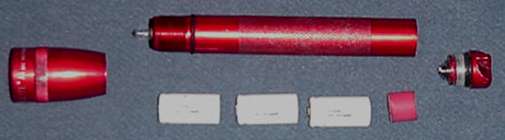 For a flashlight that gets used daily, rechargable batteries can be a good investment. I use a MiniMaglite® converted with a white LED and NiCads as my every-night flashlight. The batteries are 3 x 400 milliamp-hour units that are the same length as N-cells. Since NiCads give 1.2 volts versus the 1.5 volts of alkalines, a 5 to 10 Ohm resistor would keep the LED current to around 30 milliamps with fresh batteries. However, LED current was about 60 milliamps (tapering to 17 milliamps when discharged) with no resistor, so I elected to use a solid aluminum spacer. Once again, the LED has lasted over 100 hours even in this overcurrent condition, produces much brighter light, and still far surpasses the lifespan of standard incandescent bulbs. Brass would be better than aluminum -- it doesn't corrode as fast, and is available in 1/2 dia rods.
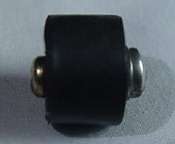
The spacer is made from 1/2 inch diameter aluminum rod, and is covered in heat-shrink tubing to prevent rattling (see photo below). It must be inserted after the last battery or else it could short to the flashlight case and interrupt the circuit. A different (slightly longer) spacer is also needed to charge the NiCads in a normal battery charger--they are shorter than regular AA cells.
For a flashlight that gets used daily, rechargable batteries can be a good investment. I use a MiniMaglite® converted with a white LED and NiCads as my every-night flashlight. The batteries are 3 x 400 milliamp-hour units that are the same length as N-cells. Since NiCads give 1.2 volts versus the 1.5 volts of alkalines, a 5 to 10 Ohm resistor would keep the LED current to around 30 milliamps with fresh batteries. However, LED current was about 60 milliamps (tapering to 17 milliamps when discharged) with no resistor, so I elected to use a solid aluminum spacer. Once again, the LED has lasted over 100 hours even in this overcurrent condition, produces much brighter light, and still far surpasses the lifespan of standard incandescent bulbs. Brass would be better than aluminum -- it doesn't corrode as fast, and is available in 1/2 dia rods.
The spacer is made from 1/2 inch diameter aluminum rod, and is covered in heat-shrink tubing to prevent rattling (see photo below). It must be inserted after the last battery or else it could short to the flashlight case and interrupt the circuit. A different (slightly longer) spacer is also needed to charge the NiCads in a normal battery charger--they are shorter than regular AA cells.
 Another NiCad Conversion
Here's another flashlight converted with NiCads. In this one, the batteries are very short, allowing the use of a spacer made from a dead AA cell with the center post soldered to the case.
Another NiCad Conversion
Here's another flashlight converted with NiCads. In this one, the batteries are very short, allowing the use of a spacer made from a dead AA cell with the center post soldered to the case.
 1 AAA Cell Flashlight Conversion
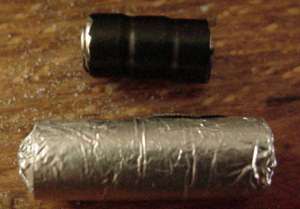
This single-AAA cell flashlite was converted using 3 tiny button cells and a dummy battery spacer made from tinfoil and a piece of wooden dowel. The button cells give 4.5 volts in series, and are simply held together with electrical tape. The voltage drops off quickly and the LED runs at near normal current after a couple minutes of on time.
1 AAA Cell Flashlight Conversion
This single-AAA cell flashlite was converted using 3 tiny button cells and a dummy battery spacer made from tinfoil and a piece of wooden dowel. The button cells give 4.5 volts in series, and are simply held together with electrical tape. The voltage drops off quickly and the LED runs at near normal current after a couple minutes of on time.
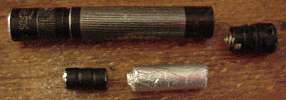
 Exploded View
 Close up of battery pack and dummy spacer
 Big 6-LED Makita® 12 Volt Conversion
 This conversion was a quick, easy project. The LED version of this flashlight gives over 100 hours of bright, broad light from a full 12 volt NiMH battery pack. We started with a 6-LED circuit using 2 parallel strings of 3 white LEDs, each string with its own 50 Ohm resistor. I simply used a voltmeter to determine which lamp terminals were positive and negative, and soldered the leads from the LED circuit board to the normal lamp terminals. The LED assembly is held in place on the concave surface of the reflector with dabs of epoxy (see photo below).
 Converting Large 3 and 4 Cell Flashlights
Larger flashlights can also be converted. We are currently experimenting with some different versions of this project. These conversions also need a current-limiting resistor in the circuit. Our experiments have shown that a 15 ohm 1/4 watt resistor is about right for this...it gives an LED current of around 30 milliamps when the batteries are fresh. Because of the extra power available from these larger batteries, it is possible to mount 2 or 3 white LEDs at once, increasing light output. We are currently experimenting with this by breaking the glass of a burnt-out bulb and soldering in 3 LEDs. The easiest way to install the resistor is to use a 4-cell flashlite with only 3 cells, plus a dummy spacer that contains the resistor. More on this project soon!
Field-Expedient Flashlight
It was a dark and stormy night. We couldn't find a flashlight anywhere in the house, the kids probably lost all of them in their rooms...and something was on the roof! It sounded big, possibly a mountain lion or a bear. So I dug up an old NiCad computer battery, gave it a 5-minute quick charge at 1000 milliamps, took a spring clamp and clipped 3 LEDs directly to the battery. Let there be light! It was only a packrat, and of course this story is mostly fabrication, but the resulting flashlight was pretty neat (see photo below).
Converting Large 3 and 4 Cell Flashlights
Larger flashlights can also be converted. We are currently experimenting with some different versions of this project. These conversions also need a current-limiting resistor in the circuit. Our experiments have shown that a 15 ohm 1/4 watt resistor is about right for this...it gives an LED current of around 30 milliamps when the batteries are fresh. Because of the extra power available from these larger batteries, it is possible to mount 2 or 3 white LEDs at once, increasing light output. We are currently experimenting with this by breaking the glass of a burnt-out bulb and soldering in 3 LEDs. The easiest way to install the resistor is to use a 4-cell flashlite with only 3 cells, plus a dummy spacer that contains the resistor. More on this project soon!
Field-Expedient Flashlight
It was a dark and stormy night. We couldn't find a flashlight anywhere in the house, the kids probably lost all of them in their rooms...and something was on the roof! It sounded big, possibly a mountain lion or a bear. So I dug up an old NiCad computer battery, gave it a 5-minute quick charge at 1000 milliamps, took a spring clamp and clipped 3 LEDs directly to the battery. Let there be light! It was only a packrat, and of course this story is mostly fabrication, but the resulting flashlight was pretty neat (see photo below).

MiniMaglite® LED Conversions
Alkaline N-Cell Flashlights
Alkaline batteries are often the best choice for flashlights, since they retain more power when sitting unused for long periods of time. And you can expect over 6 times longer battery life when using a white LED bulb! This is important when a flashlight must sit in your truck for weeks or months without use. In this situation, NiCad or NiMh rechargables would most likely have little power left in them after sitting for months. Alkaline N-cells are inexpensive and usually locally available--try Radio Shack or K-Mart.
To convert a MiniMaglite®:
- Take off the flashlight head and remove the incandescent bulb. Save the bulb for future use if you ever decide to return your flashlight to its original condition.
- Trim the tabs off of the LED leads using nippers. A flat needle file or sandpaper can help smooth the lead.
- Trim the LED leads off to 1/4 inch in length.
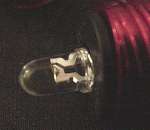
- Insert the LED into the bulb socket. If does not light up, reverse the LED and it will. If not, check your batteries, and also make sure the LED leads are not touching each other.
- Remove the reflector, and using a 1/4 inch drill bit carefully widen the hole for the bulb to 1/4 inch. Our LED bulbs do not need reflectors since they emit light at a set 20° angle, but the reflector assembly is needed in a MiniMaglite® for the switch to function properly.
Next,
- Install the 3 N-cell batteries.
- Install a spacer (containing an internal current-limiting resistor)
For a flashlight that gets used daily, rechargable batteries can be a good investment. I use a MiniMaglite® converted with a white LED and NiCads as my every-night flashlight. The batteries are 3 x 400 milliamp-hour units that are the same length as N-cells. Since NiCads give 1.2 volts versus the 1.5 volts of alkalines, a 5 to 10 Ohm resistor would keep the LED current to around 30 milliamps with fresh batteries. However, LED current was about 60 milliamps (tapering to 17 milliamps when discharged) with no resistor, so I elected to use a solid aluminum spacer. Once again, the LED has lasted over 100 hours even in this overcurrent condition, produces much brighter light, and still far surpasses the lifespan of standard incandescent bulbs. Brass would be better than aluminum -- it doesn't corrode as fast, and is available in 1/2 dia rods.
The spacer is made from 1/2 inch diameter aluminum rod, and is covered in heat-shrink tubing to prevent rattling (see photo below). It must be inserted after the last battery or else it could short to the flashlight case and interrupt the circuit. A different (slightly longer) spacer is also needed to charge the NiCads in a normal battery charger--they are shorter than regular AA cells.
1 AAA Cell Flashlight Conversion
This single-AAA cell flashlite was converted using 3 tiny button cells and a dummy battery spacer made from tinfoil and a piece of wooden dowel. The button cells give 4.5 volts in series, and are simply held together with electrical tape. The voltage drops off quickly and the LED runs at near normal current after a couple minutes of on time.
Exploded View
Close up of battery pack and dummy spacer
Big 6-LED Makita® 12 Volt Conversion
This conversion was a quick, easy project. The LED version of this flashlight gives over 100 hours of bright, broad light from a full 12 volt NiMH battery pack. We started with a 6-LED circuit using 2 parallel strings of 3 white LEDs, each string with its own 50 Ohm resistor. I simply used a voltmeter to determine which lamp terminals were positive and negative, and soldered the leads from the LED circuit board to the normal lamp terminals. The LED assembly is held in place on the concave surface of the reflector with dabs of epoxy (see photo below).
Converting Large 3 and 4 Cell Flashlights
Larger flashlights can also be converted. We are currently experimenting with some different versions of this project. These conversions also need a current-limiting resistor in the circuit. Our experiments have shown that a 15 ohm 1/4 watt resistor is about right for this...it gives an LED current of around 30 milliamps when the batteries are fresh. Because of the extra power available from these larger batteries, it is possible to mount 2 or 3 white LEDs at once, increasing light output. We are currently experimenting with this by breaking the glass of a burnt-out bulb and soldering in 3 LEDs. The easiest way to install the resistor is to use a 4-cell flashlite with only 3 cells, plus a dummy spacer that contains the resistor. More on this project soon!
Field-Expedient Flashlight
It was a dark and stormy night. We couldn't find a flashlight anywhere in the house, the kids probably lost all of them in their rooms...and something was on the roof! It sounded big, possibly a mountain lion or a bear. So I dug up an old NiCad computer battery, gave it a 5-minute quick charge at 1000 milliamps, took a spring clamp and clipped 3 LEDs directly to the battery. Let there be light! It was only a packrat, and of course this story is mostly fabrication, but the resulting flashlight was pretty neat (see photo below).